The Gear Swapping page is an essential efficiency module in MapleToolkits. Its primary purpose is to help you calculate the exact damage and combat stat differences when swapping between different gear pieces.
By performing real-time difference (Diff) calculations, the tool analyzes set effects and stat changes to show you exactly how a swap will affect your final damage output, helping you make optimal progression and purchasing decisions.
Prerequisites: Select a Character First
Before you can utilize the Gear Swapping tool, you must select an active character profile. The tool requires a character profile to establish your baseline stats and current equipment configuration.
If you haven’t selected a character or if no swapping sets are configured, you will see a prompt to load your profile:
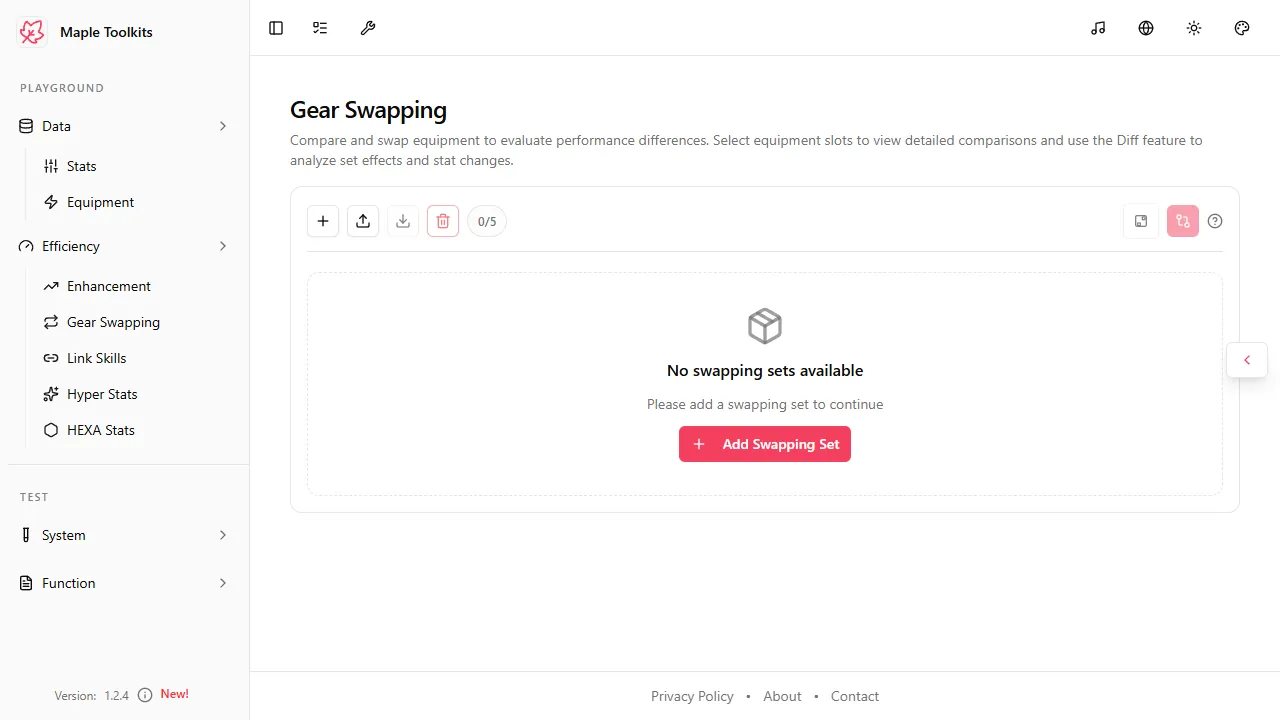 (Select a character profile from the Quick Switch panel to load the interface)
How to select a character:
- Click the Quick Switch button docked on the right side of the screen.
- Select your desired character profile from the Character dropdown.
- Ensure your active Stats Set and Equipment Set are configured, as these serve as the baseline for all swapping calculations.
1. Swapping Sets Management (Action Bar)
Once a character is loaded, the main interface becomes active. At the top of the module, you will find the Action Bar, which allows you to manage your swapping configurations.
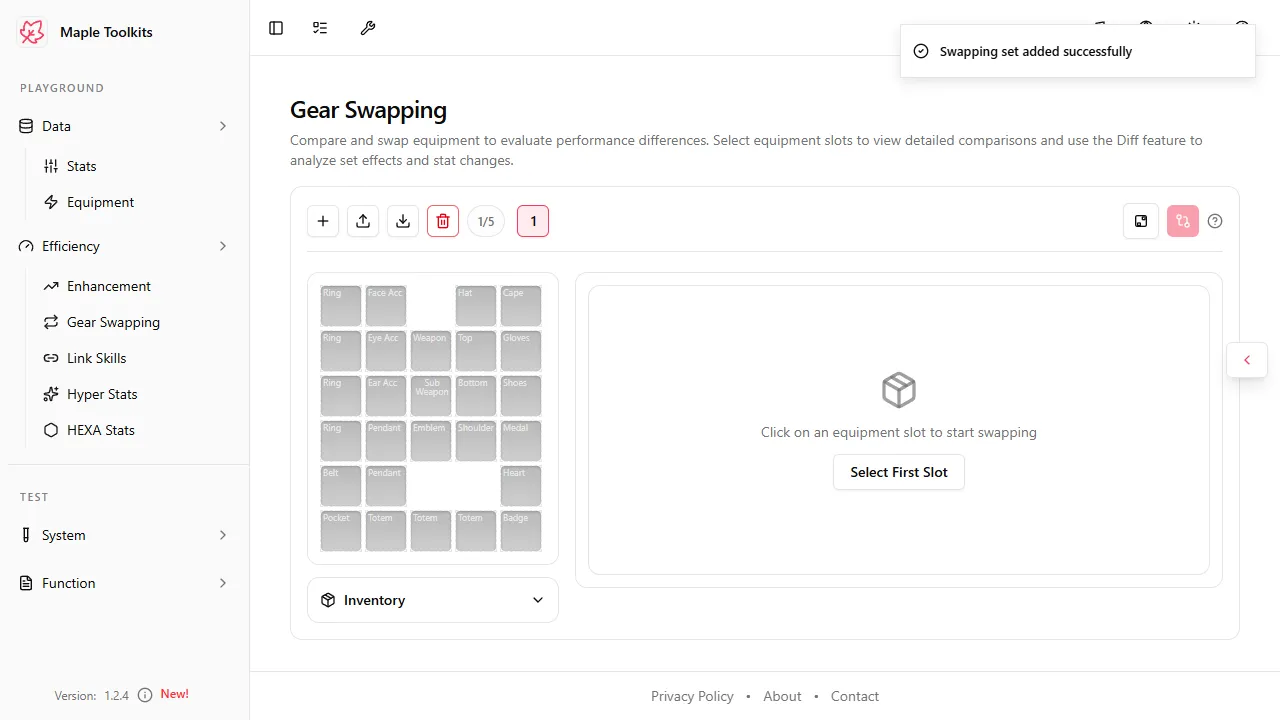
- Multiple Swapping Sets: You can create, manage, and switch between up to 5 different swapping sets (e.g., Set 1, Set 2). This is useful for comparing different gear paths or progression strategies simultaneously.
- Action Buttons:
- Add Swapping Set (
+): Create a new swapping set tab. A notification “Swapping set added successfully” will confirm the creation. - Upload / Import: Import previously saved swapping configurations.
- Download / Export: Export your active swapping sets to share or back up your configurations.
- Delete (Trash): Permanently delete the currently selected swapping set.
- Add Swapping Set (
2. Equipment Grid, Details Panel & Inventory
The main work area is split into three primary sections:
2.1 Character Equipment Grid (Left Side)
This grid displays a 5-column layout representing your character’s currently equipped items, loaded directly from your active Equipment configuration:
| Column 1 | Column 2 | Column 3 | Column 4 | Column 5 |
|---|---|---|---|---|
| Ring 1 | Face Acc | (Empty Space) | Hat | Cape |
| Ring 2 | Eye Acc | Weapon | Top | Gloves |
| Ring 3 | Ear Acc | Sub Weapon | Bottom | Shoes |
| Ring 4 | Pendant 1 | Emblem | Shoulder | Medal |
| Belt | Pendant 2 | (Empty Space) | (Empty Space) | Heart |
| Totem 1 | Totem 2 | Totem 3 | Badge |
2.2 Equipment Comparison Details Panel (Right Side)
When you click on any equipment slot in the character grid, the right side of the workspace displays the Equipment Comparison Details Panel. This panel allows you to view, customize, and compare both the current and proposed equipment for that specific slot.
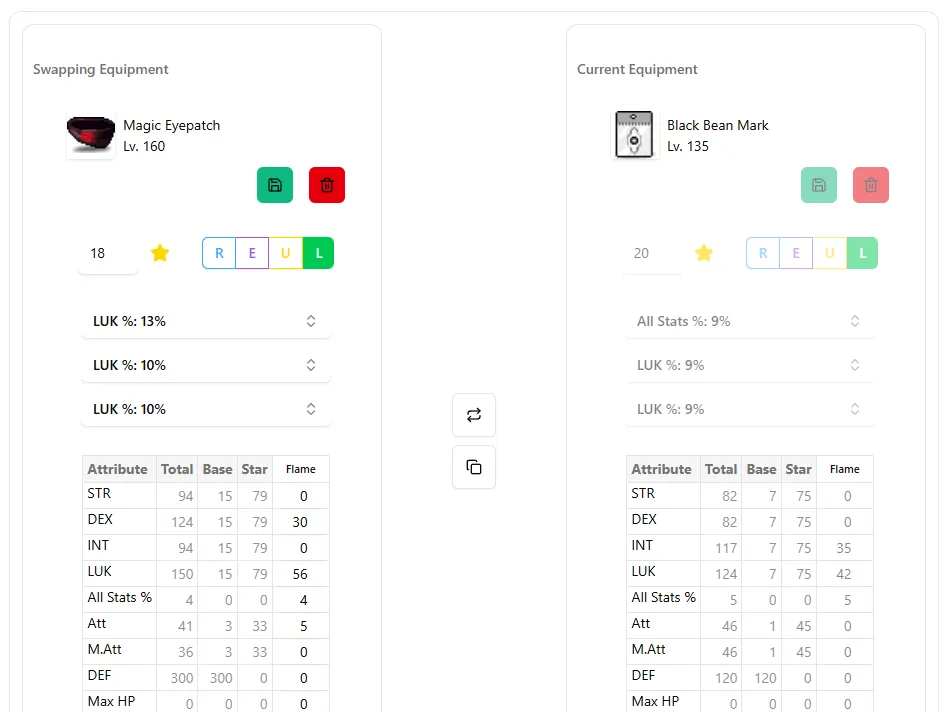
The details panel is split into three distinct columns:
A. Swapping Equipment (Left Column)
This represents your proposed replacement gear. You can select and configure its stats:
- Item Selection: Choose a replacement item from the pre-configured equipment database for that specific slot type (you cannot manually type the item name or level, as the items are predefined to ensure database and set effect accuracy).
- Save / Delete: Click the green Save button to apply the replacement item to the swapping set, or the red Delete button to remove it.
- Star Force & Potential: Modify the Star Force level and select the Potential rank (Rare, Epic, Unique, Legendary) and lines (e.g., LUK %, All Stats %) using dropdowns.
- Attributes Table: View the granular stat breakdown by category (Base, Star Force, Flame). Within this table, you can edit the Flame and Scroll values directly, while the Base and Star Force stats are automatically derived and read-only.
B. Middle Control Column
Contains utility buttons for quick swapping and cloning:
-
Horizontal Swap Button (
⇆): Swaps the Swapping Equipment and Current Equipment, making it easy to exchange them. -
Clone / Overwrite Button (overlapping squares): Copies the stats of the Current Equipment (Right) onto the Swapping Equipment (Left).
TIP: Use the Clone button to quickly test incremental upgrades. By cloning your current gear, you can immediately test what happens if you add 1 Star Force level or change a potential line on your existing equipment without having to manually recreate the entire item.
C. Current Equipment (Right Column)
Displays your character’s currently equipped baseline gear in that slot:
- All inputs, potential lines, and attribute tables are read-only (faded/disabled) to prevent accidental changes, ensuring your baseline remains a stable reference point.
2.3 Inventory Drawer (Bottom)

Located directly beneath the equipment grid, the expandable Inventory drawer houses alternative or backup gear that you can swap into the character grid for comparison.
This inventory is shared globally across the platform. You can manage and import gear here just as you do in the Equipment module.
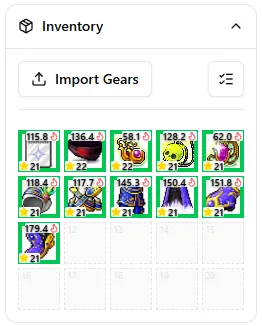
A. Inventory Action Bar
This bar contains tools for importing and managing your inventory equipment:
-
Import Gears (Left Side): Import equipment screenshots or quickly snap screenshots via window sharing.
-
Capacity Constraint: You can import or screenshot up to the number of remaining empty slots in your Inventory.
-
Gear OCR: Click Gear OCR after loading screenshots to perform optical character recognition. The system automatically parses and extracts critical equipment data—such as item name, star force level, base stats, scroll stats, flame stats, potential rank, and potential lines—to populate empty inventory slots with the recognized items.
-
OCR Accuracy Tips:
Click to expand OCR pre-setup and capture details
I. Pre-setup Settings
-
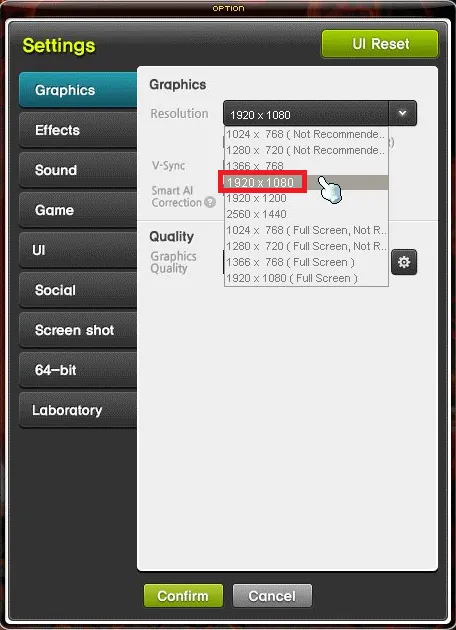
UI Size & Resolution: Set your game options as follows.
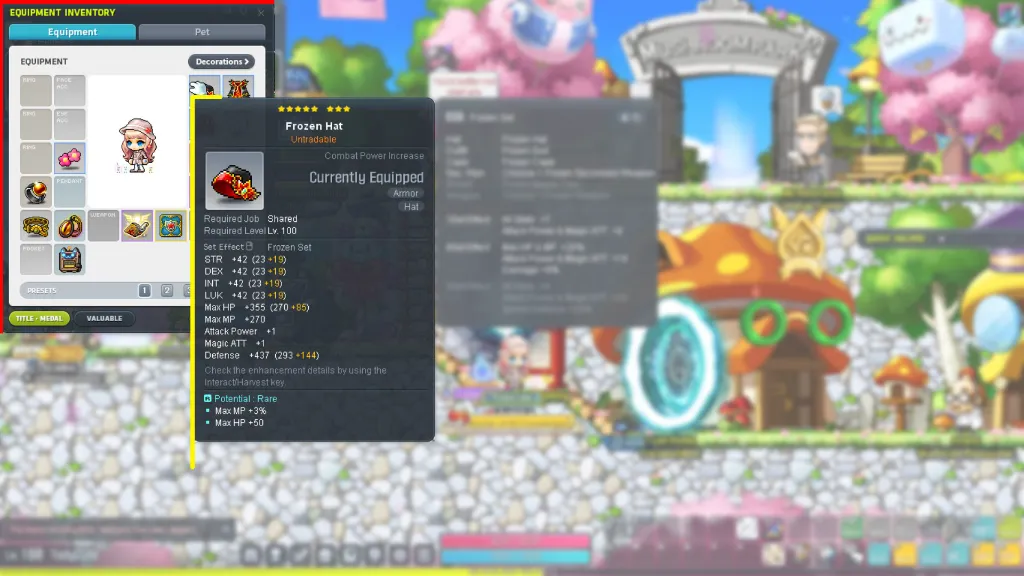
UI Size: Ideal Ratio Resolution: 1920x1080 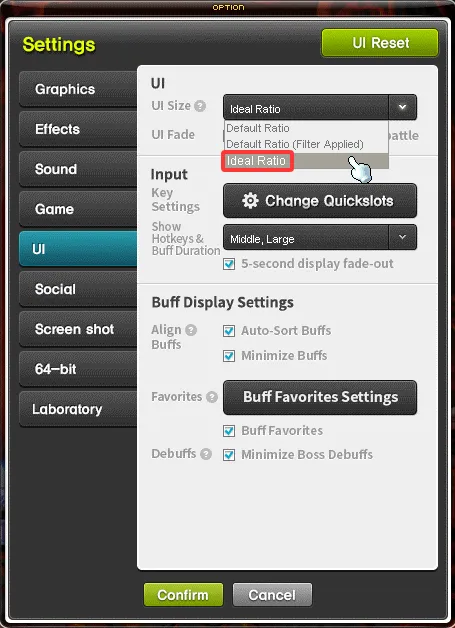
-
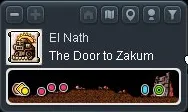
Location: Position your character at ‘The Door to Zakum’ (accessible via Boss Contents -> Zakum -> Move to Boss).
Move to Boss The Door to Zakum 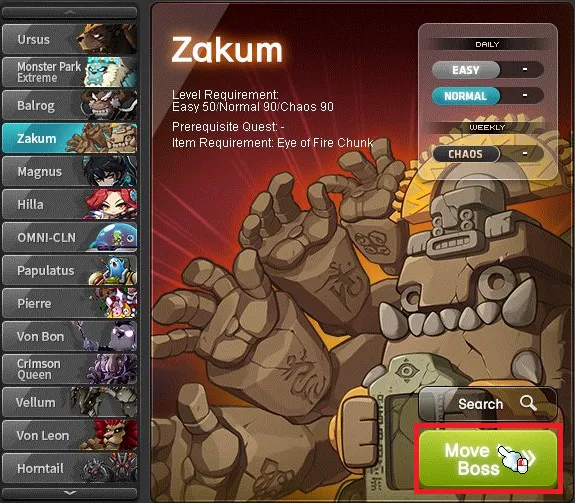
-
Screenshot Sample: Place the Equipment Inventory in the top-left corner of the screen, with its border aligned against the top and left edges. Otherwise, at the very least, ensure the cursor is positioned to the left of the tooltip.
II. Quick Capture Details
- Once you have shared the game window, return to the tool page.
- Hover your mouse over the equipment inside the game window to display the tooltip (move the cursor only, do not click).
- Press Space or Enter to capture the current frame.
-
-
-
Multi-Select Mode (Right Side): Toggle multi-select to batch remove multiple items from the inventory at once.
3. Performing a Gear Swap
Unlike simple single-item calculators, the Gear Swapping module supports multi-item comparisons simultaneously. This allows you to plan complex upgrades, such as swapping multiple accessories at once to transition set effects (e.g., swapping a Dawn Boss ring and pendant for Pitched Boss pieces).
Step-by-Step Workflow
There are two primary ways to configure and queue gear swaps:
Method A: Drag-and-Drop from Inventory (Recommended for existing alternative gear)
- Drag and Drop: Simply drag a backup gear piece from your globally shared Inventory Drawer at the bottom and drop it directly onto the corresponding slot in the character equipment grid above.
- Immediate Queue: Dropping the item automatically sets it as the proposed replacement gear (the Swapping Equipment) for that slot.
- Refine Details: Click the swapped slot at any time to open the details panel on the right and fine-tune its Star Force level, flame stats, or potential lines.
Method B: Manual Configuration (Recommended for simulating hypothetical gear)
- Select an Equipment Slot: Click on any slot in the character equipment grid (e.g., click on a Gloves slot).
- Select and Configure Swapping Gear: In the details panel on the right, the Swapping Equipment (left column) will load a selection dropdown. Select a replacement item from the pre-configured equipment database for that specific slot type.
- Refine Enhancement Details: Once the item is selected, customize its enhancement stats—such as Star Force level, Potential rank/lines, and flame—to simulate the hypothetical piece of gear.
- Save the Swap: Click the green Save button to queue this simulated item into the swapping set.
Managing and Running the Comparison:
- Add Multiple Swaps: You can queue multiple swaps across different slots simultaneously within the same swapping set by repeating the steps above.
- View Active Swaps: Any slot in the character grid that has an active proposed swap will display the replacement item. Clicking that slot will automatically open the details panel on the right and load the proposed replacement gear (left column) and the baseline gear (right column) for side-by-side comparison and editing.
- Trigger the Diff Comparison: Once all your desired swaps are queued, click the Diff button on the action bar to open the comprehensive comparison modal.
4. Comparison & Diff Analysis
The Diff modal provides a highly detailed, mathematically rigorous breakdown of the performance changes between your current equipment set and the proposed swapping set.
4.1 The Under-the-Hood Calculation Engine
To ensure absolute mathematical accuracy and properly account for the diminishing returns of stats in MapleStory, the tool utilizes different calculation pathways depending on whether you use Auto Stat Efficiency (ASE) or Custom Stat Efficiency (CSE) (both of which are detailed in the Stats & Stat Efficiency Guide):
A. Auto Stat Efficiency (ASE) Pathway
When using ASE, the engine performs a sophisticated multi-stage calculation to account for stat diminishing returns:
- Deduct Affected Gear Stats: The engine first deducts all stats contributed by the equipment currently occupying the slots being diffed. This includes the items’ base attributes, enhancement stats (Scrolls, Star Force), potential lines, flame values, and any set effect bonuses contributed by those specific items.
- Establish New Baseline: With these stats temporarily removed, the tool establishes a clean, gear-deducted baseline for your character.
- Recalculate ASE: The engine recalculates a new Auto Stat Efficiency (ASE) table based on this clean baseline.
- Evaluate and Convert: The tool then evaluates both the current equipment and the new equipment using this newly calculated ASE, converting their attributes into equivalent Final Damage % (FD%) values.
- Compute Deltas: The final differences are compared and rendered in the comparison window.
NOTE: By recalculating the ASE on a gear-deducted baseline, the tool eliminates calculation errors caused by evaluating new equipment against an inflated baseline, ensuring your simulated gains match actual in-game performance.
B. Custom Stat Efficiency (CSE) Pathway
If you choose to use CSE for your comparison, the engine bypasses the dynamic recalculation steps:
- Direct Conversion: The tool strictly and directly evaluates the attributes of both the current and swapping equipment using your manually defined, static CSE weights.
- Static Comparison: It compares the attribute values of the equipment before and after the diff directly based on the CSE weights, without performing gear deductions or baseline recalculations.
4.2 Deciphering the Diff Modal
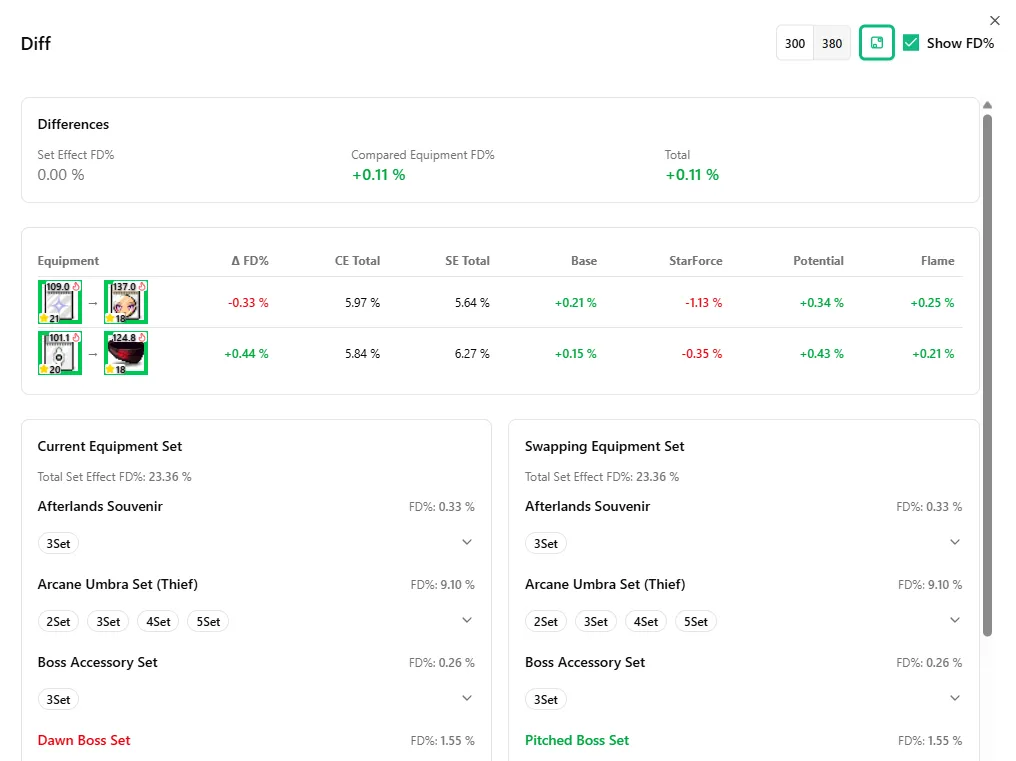
The Diff modal is divided into three key analytical sections:
A. Differences Summary (Top)
Shows a high-level summary of the final damage impact:
- Set Effect FD%: The net change in Final Damage % from losing or gaining set effects.
- Compared Equipment FD%: The net change in Final Damage % from the individual stats of the items themselves.
- Total: The overall Final Damage % change (the sum of the Set Effect and Compared Equipment deltas).
B. Equipment Breakdown Table (Middle)
Details the comparison for each swapped slot:
- Equipment: Displays the original gear piece and the proposed replacement (e.g.,
21★ Ring -> 18★ Hat). - Δ FD%: The net Final Damage % change for this specific slot.
- CE Total: The total Final Damage contribution percentage of the Current Equipment in this slot.
- SE Total: The total Final Damage contribution percentage of the Swapping Equipment in this slot.
- Stat-by-Stat Delta: A granular breakdown of the Final Damage % changes categorized by:
- Base: Raw item base stats.
- StarForce: Star Force and scroll enhancements.
- Potential: Potential rank and lines.
- Flame: Bonus stats.
C. Set Effect Comparison (Bottom)
Provides a side-by-side view of active set effects between your Current Equipment Set and Swapping Equipment Set:
- Lists each active set (e.g., Arcane Umbra, Pitched Boss Set, Dawn Boss Set) and its corresponding FD% contribution.
- Newly activated sets or sets with increased thresholds are highlighted in green, while deactivated or downgraded sets are highlighted in red, making it easy to track how set effect shifts impact your overall damage.
Access the Live Tool
Ready to optimize your equipment layout?
👉 Access the Live Gear Swapping Dashboard
Guide details, assumptions, and verification
Supported scope: MapleStory Global-style equipment comparisons. Last reviewed: July 20, 2026.
Method: Gear Swapping compares the entered current and proposed items, including the selected set effects. Auto Stat Efficiency recalculates a clean baseline before comparison; Custom Stat Efficiency applies the player’s static weights. The result is an estimate based on the profile, not an official damage test.
Worked example: Compare a current 21-star ring to an 18-star replacement only after entering both items’ potentials, flames, and set membership. Run Diff, then inspect the Set Effect and Compared Equipment sections separately. A positive item delta can still be outweighed by a lost set effect.
Troubleshooting: If a swap has an unexpected result, verify item type, unique-equipping constraints, active set effects, and the selected stats profile. Test one changed slot at a time.
Sources and updates: Check official MapleStory notices when equipment rules change. Update history: July 20, 2026 — added assumptions, example, and troubleshooting.